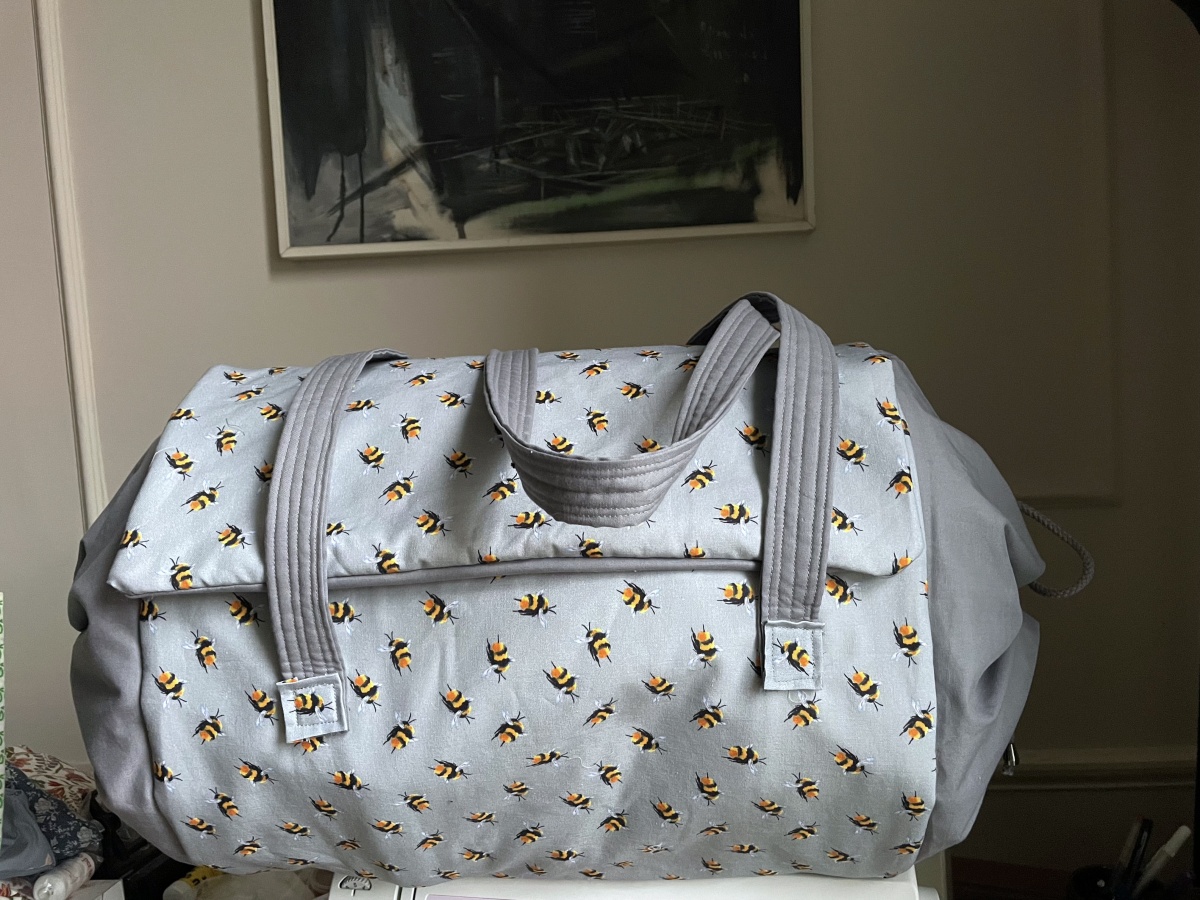
How to make a practical and efficient bag to carry a bobbin lace bolster and accessories, with pockets, quilted carrying straps and proteprotective padding.
Come fare una borsa portatombolo.
I have been wanting this one for a long time – something simple and not too voluminous to carry my bolster and some accessories around.
There are some lovely designs out there, and small bolster can even be made to fit a backpack! But alas Cantù bolster, with their 24-25cm diameter, aren’t quite suited to that.
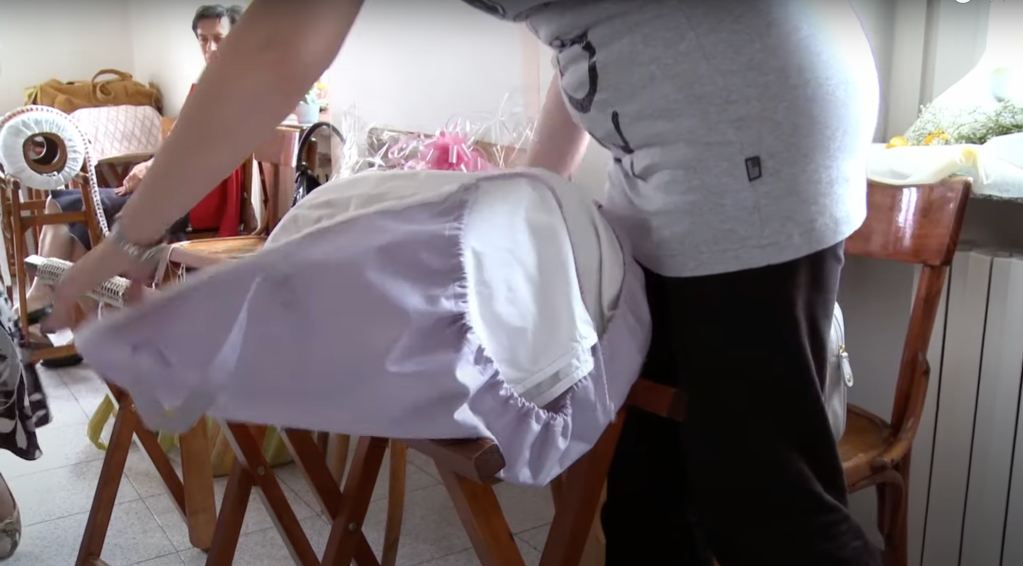
Since this is not a new problem, unsurprisingly there is a very effective solution: a rectangle of fabric that wraps around the pillow, with handles. It doubles up as cloth to put on the trestle for working, though since you want some kind of attrition on the trestle to hold the pillow still, while some leave the bag on the trestle and use the “tapparella” over it, others prefer to remove it. You can see the typical setup when transporting pillow and work in the two videos below (click on the picture to access the videos). In the first one, setup is in the first few minutes – in first view you have the simplest of bags:
Setting up to work from carrying bag – click on the image for full video (opens in new tab)
In this other video (again, click on the picture to watch it) you have more elaborate bags (you have to skip to minute 8:45 to see one setup in full view, at the beginning of the video there is one lacemaker with the bag on the trestle, but is mostly covered by the two people speaking in the foreground). From minute 8:45 on you can see three ladies with three different styles of bags, some have strings to attach the various flaps of the opened bag to the trestle.
A setup with the carry bag in place on its trestle – you can see the handles hanging below (click on the image for full video, opens in new tab).
In short, to discharge its basic function, a simple rectangle of fabric with string cords at the ends would do – still, if you have to carry it for longer stretches, and/or you wish to protect your work, or “just because”, why not make a more elaborate one, and maybe add space and pockets for bits and pieces?
I have seen some really nice examples of handmade bags, which I took inspiration from to sew up mine, especially here and here
I used the following:
cotton batting (or wadding, or padding – same thing)
very light fabric to sandwich the batting as I did not want to quilt the bag. So I took some ivory cotton popeline to fix/trap the batting;
a printed fabric and a matching plain colour fabric – both quilting cotton;
some cord.
All of the above (fabric, batting, cord) used are 100% cotton.
The design is really simple – I cut:
five identical rectangles of batting (x1), printed fabric (x1), plain fabric (x1), popeline (x2) for the main body of the bag. These measured 118cm by 44.5cm (I was aiming to be able to accommodate a bolster up to 40cm wide).
two lined pockets to fix to the inside body
four identical rectangles for the drawstring sides, in printed (x2) and plain (x2) fabric; these measured 99cm by 20cm.
two strips of batting for the handles, and corresponding plain fabric strips (twice the width of the batting, and same length – my batting was 3cm wide, thence he fabric was 12cm wide), 120cm long (to obtain a 115cm finished strap).
For assembly, I followed these steps:
sandwich the batting between the poplin strips;
made the pockets and sew them on the plain fabric lining;
made the drawstring sides (sew three sides with right side facing, then turn inside out, making sure you leave about 1cm opening on the short sides, just below the long side, for the cord to go through);
made the handles and fixed them to the outer, printed fabric and the quilted padding (so the stitches won’t show in the internal lining). Obviously the fabric must lie with the right side up, and sit on top of the padding
stitched through both long sides and a short side of following layers (from bottom to top): quilted padding, side panels, printed/outer fabric (right side up), plain/lining fabric (wrong side up).
turn inside out (or rather, “outside in’), hand stitch the short side, pull the cords, and it is done.
the padding sandwichone of the two internal pocketsa sideA side opened upTidying the ends of the padded straps
English speaking countries and continental Europe are well versed in so called “Milanese lace”, thanks to the work carried out by Vera Cockuyt, Barbara Corbet, Christine Mirecki and Pat Read, to cite but a few, and there are very many modern designers in this style, from Claire Bonito to Sandy Wood just to name two.
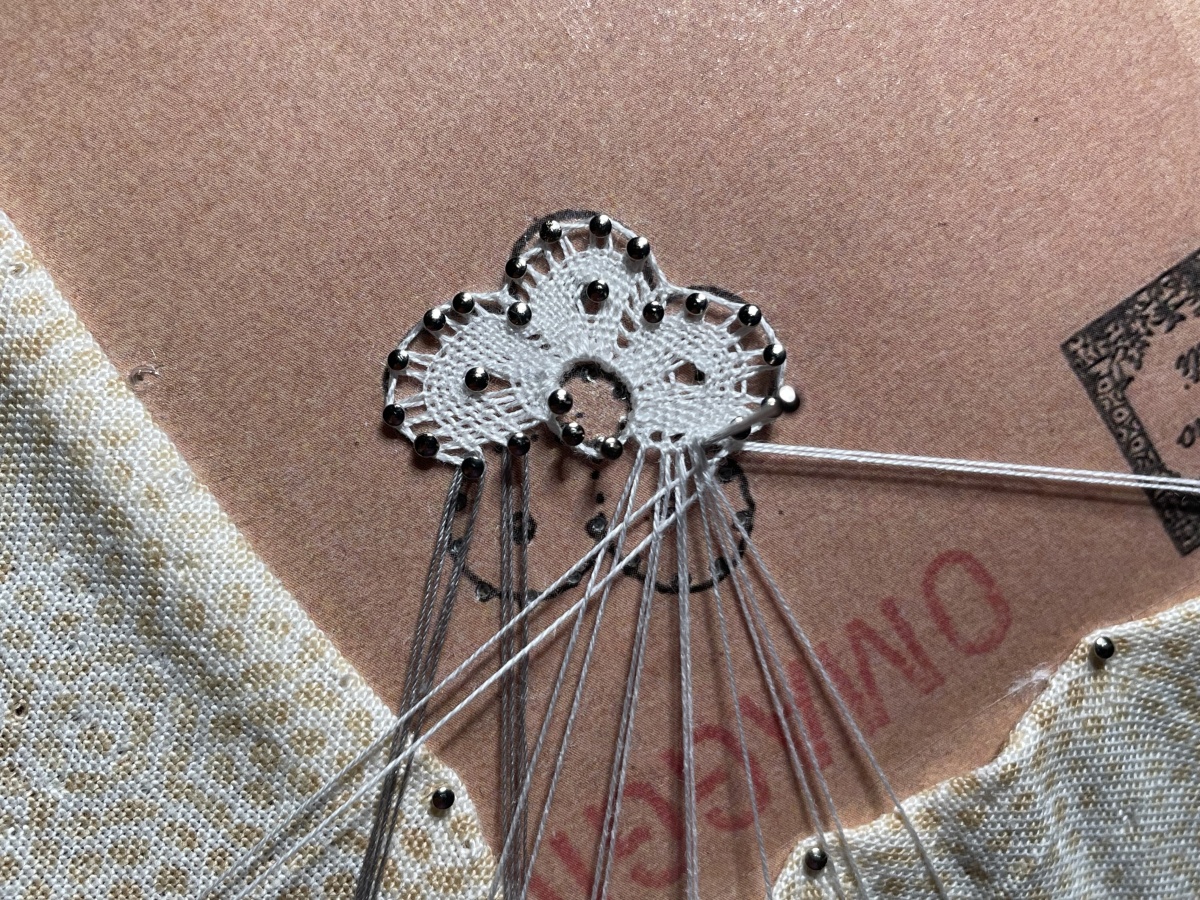
But as I have written already, so called “Milanese Lace” is only one set of stitches from the much larger family that make up Cantù lace. I won’t go into that anymore, (though you can check my previous post to read and see more Cantù lace), since I want to show you one of the prettiest elements, I think, of this beautiful type of lace, the “little flower”, called Fiorellino, Fiorellino con seme, or Rosellina (and I am sure there are other variations). The name can vary, and so can the way the characteristic little holes in each petal are worked, but the look is one and only.
While there used to be a school for the teaching Cantù lace, sadly this is no more, and so it ins’t that straightforward to figure out the exact standard. There aren’t many written text either, and on top there is no guarantee that a written text will report any technique correctly, and with folk art it isn’t even clear what “correct” means – as far as I am concerned, I’ll try as much as possible to go by what I think is the standard that the Accademia De Amicis wanted to teach – but there too I am shooting mostly in the dark, and so take this with a pinch of salt. But I am going to give you all variations that I am aware of. Reassuringly, the outcome is similar (with some important caveat) independently of the methodology used.
First off, what should a nicely worked “fiorellino” look like? As far as I can tell (and again, I am no authority, just reporting on my research on this topic) the characteristics to look out for are:
flat petals;
clearly visible separation of the petals
clearly visible hole at the centre of each petal;
cut threads invisible from the front.
So, how to work it? I am going to share what I’ve found from four sources, describing how it could be worked. There are many variations, and to keep it easier to follow, I am going to label the petal pinholes, so that there won’t be any ambiguity when I refer to “first” pin, “last” pin, and so on.
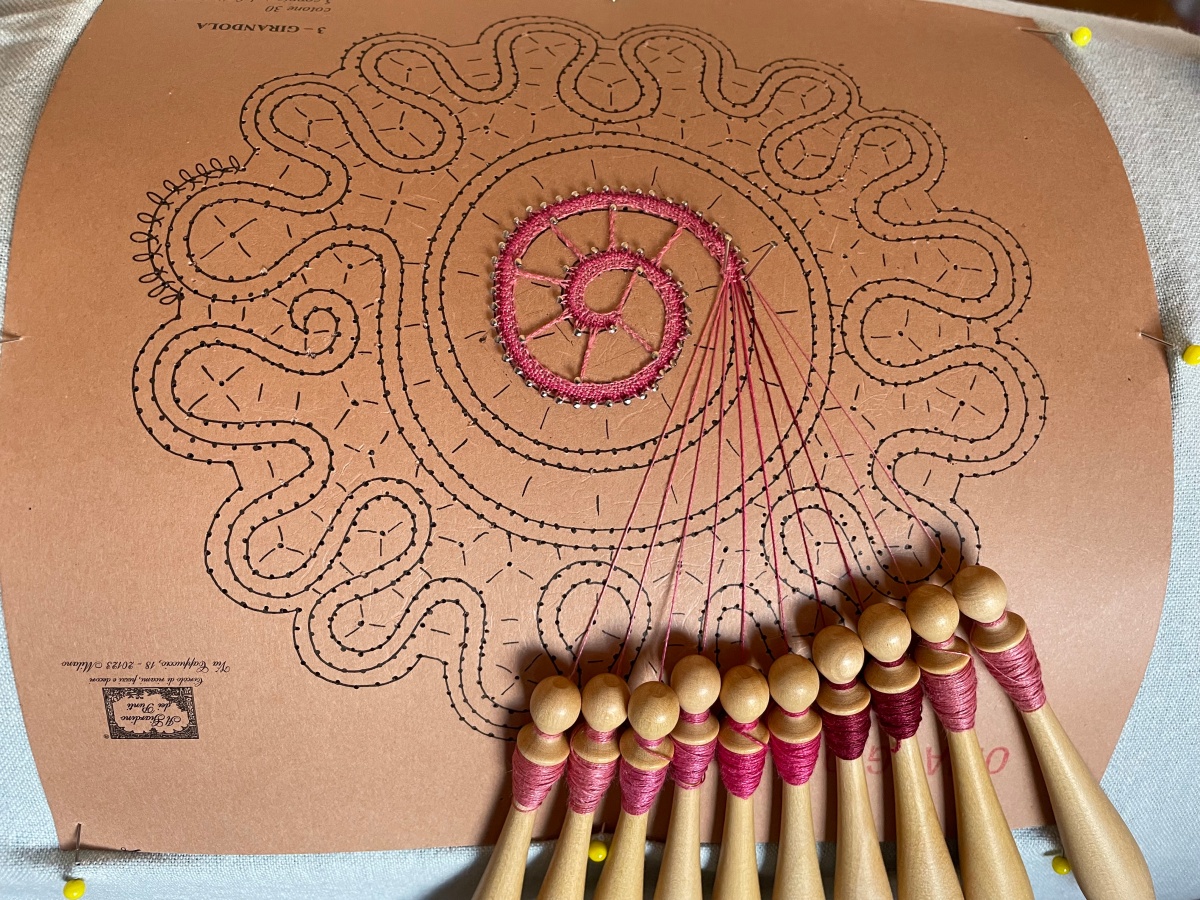
In this pricking the number of pins varies. Suggested number of pairs is 7 wound with cotton #40.
My sources
There is a (surprising to me) number of ways to work this little flower! I have come across four of them from the following sources:
Il Giardino dei Punti– this flower’s technique is the one according to Elena Arienti. In general this School refers to the teachings of the Accademia de Amicis
Speciale Scuole Mani di Fata – issue 1. These were yearly booklets accompanying the September issue of this magazine, which always contained a handful of lace prickings. The booklet provided guidance on how to execute the lace, so the various elements depend on which designs were present in each September issue. These are hard to find in hard copy, but it is possible to purchase almost all the issues at the link above.
Emanuele Bonaglia/The Lacemaker Diary. Issue 4 of his booklets deals with the “fiorellino”. He also has four free videos on how to work it, slightly differently, so I’ll follow the booklet version.
Civiltà Canturina – “Passo Passo verso il Pizzo di Cantù”, issue 1.
Starting the flower – the seed (seme)
You begin by working the little circle in the centre. While all methods work a braid (repetition of TC) to go around the central “seme” (seed) and sew the innermost pair to the initial pin to close the circle, there are variations:
a. (Il Giardino dei Punti): start with three pairs. CTC though the first pair going from right to left, abandon right pair, CTC with third pair, then make a braid between these two. The braid goes clockwise around the pins around the central seme. Close by sewing in the initial pin. Now the pair that you had abandoned originally becomes the worker pair.
b. (Speciale Scuole Mani di Fata). Start with two pairs, make a braid counterclockwise, sew in initial pinhole. Then hang the other pairs you need for the flower, and use the second pair from the right as worker (the first pair is for the footside)
c. (Lacemaker Diary/Emanuele Bonaglia): make the braid counterclockwise with two pairs and sew into the first pinhole. Use the innermost pair as the worker.
d. (Civiltà Canturina): make the braid (also clockwise) with two pairs and sew into the first pinhole. Use the rightmost of these braid pairs as worker, and CTC through the other pairs you have added, place the external pin and abandon this worker, which will then be used for the footside. Now take the second pair that had worked the braid, and use it as worker.
What could possibly go wrong? Second attempt, what isn’t working
Adding the remaining pairs
a. (Il Giardino dei Punti). Add two pins along the line of separation between two petals, one in the middle and one on what would be the last pin. Hang half of the necessary additional pairs in one, and half in the other.
b. (Speciale Scuole Mani di Fata). Place three pins along the separation line, with the remaining number of pairs shared over these. At least two pairs on the most external pin, with one pair becoming the worker.
c. (Lacemaker Diary/Emanuele Bonaglia): as in b.
d. (Civiltà Canturina): Place as many pins as additional pairs along the separation line, and hang one pair to each pin. One of the pairs that worked the braid at the centre becomes the worker.
Working the hole in each petal.
In the first three cases you start working the hole coming from the outside towards the centre. And here they are:
a. (Il Giardino dei Punti): work a “doppio punto (CTC CTC)” with the third-to-last pair, go back towards the outside, pin and work the footside, come back in and repeat a “doppio punto” with the same third-to-last- pair, lift it out of the way, continue working towards the centre, hook up the centre stem, then work your way back to the outside, this time working all pairs (pulling back one the one you had pulled out)
b. (Speciale Scuole Mani di Fata) work a “punto e mezzo (CTC TC) with the third-to-last pair, and with the second-to-last pair, work the last pair in cloth stitch as normal, hook the stem. Coming back, work the first pair from the left in cloth stitch, and the second pair in “punto e mezzo”, then abandon these three pairs. Now pick up the next pair (the first to be worked as “punto e mezzo” in the previous round) and use it as worker for the other pairs proceeding in an outwardly direction. This set of pairs on the right hand side keep working independently until the external curve of the petal is shaped, always working the “last” pair in the middle with a “punto e mezzo”. The number of rounds will depend on how big the petal is, it could be once or twice. Once the external curve of the petal is shaped, the two central workers are worked together in a “punto e mezzo”, and either of the two workers can be selected as the only worker to continue working normally in cloth stitch, depending on whether you wish to work towards the inside or towards the outside of the petal (typically you’d work towards the inside, which has been worked less)
c. (Lacemaker Diary/Emanuele Bonaglia): work a “punto e mezzo (CTC TC) with the third-to-last pair, come back toward the outside of the petal, pin to do the footside, and go back working all pairs as normal.
d. (Civiltà Canturina): Start working the hole when the worker is travelling outwards – once you get to the centre of the petal, twist the worker twice, then continue as normal working the remaining pairs in cloth stitch. Coming back in, work the pairs in cloth stitch until you get to the last passive pair before where you twisted the worker, and make an half stitch with this one; now come back out, working as normal, pin the footside, and in the next row work all pairs before the twist in cloth stitch, twist the worker twice, twist the first passive pair after the hole twice, and then continue as normal.
Separating the petals
The separations between petals are also worked differently:
a. (Il Giardino dei Punti): make a row at Punto St Anna/attorcigliato (TTCTC), two twists to make it show better.
b. (Speciale Scuole Mani di Fata): twist the worker once before working cloth stitch with the passive pairs.
c. (Lacemaker Diary/Emanuele Bonaglia): work a row in half stitch (TC)
d. (Civiltà Canturina): for this one directions are less clear, but you make a cordon by twisting the worker repeatedly, so that it covers the whole space between the last external pinhole and the centre of the flower, and twist each passive first on itself, and then once around the worker (so there are no stitches made in this case, only the twisting around).
How to close the work
Again, each one is different:
a. (Il Giardino dei Punti): You start closing before working the second to last pin (so after hooking the worker into the centre of the flower). This last phase consists in working three rows. Start by throwing out the two passive bobbins that lie above the work and are closest to the centre – these will be knotted and cut. Work in cloth stitch to the second to last pin, come back, and sew the worker into the centre (this way you have removed the chance that the thrown out pair creates a hole). Now you start the closing proper. Twist the central pair twice (or same number of times as for the separation between petals), and sew into the central pin where you hung the pairs at the beginning. Then twist twice and sew the pair(s) to the left through the cloth stitch between the central pair and the centre of the flower. Do the same for the pairs on the right, apart from the abandoned pair for the footside, that is sewn through the footside pinhole. Finally go back to the worker, and work a “punto e mezzo” (CTC TC) with all pairs
b. (Speciale Scuole Mani di Fata): not specified – I guess approach 1 would work just fine, but they do not explain how the cordon would be closed.
c. (Lacemaker Diary/Emanuele Bonaglia): work from out going in the separation row and sew the worker in the centre. The proceeding from the footside going towards the centre, sew in all pairs (not specified how, I guess as under a)
d. (Civiltà Canturina): This will be a hybrid of a. and b., for there aren’t as many pins as pairs, so at least one pair will have to be sewn into the cloth stitch.
My attempts
Note: in the prickings I am using, each petal can have either 5, 6 or 7 pinholes (counting as in the first picture).
First three “fiorellini”, the right side. Not great, but I see an improvement from the very first, on the left, to the third one, on the right. If only I had closed better, the third one would have been passable!
I think I’ve settled on the following “optimal” places where to start the petal hole (when using the first method):
for petals with 5 or 6 pinholes, start working the hole after placing pinhole number 2;
for petals with 7 pinholes, start working the hole after placing pinhole number 3.
work the St Anna stitch on the return leg after placing the second to last pin, on your way to the last pinhole for that petal.
In the very first attempt I failed at all but one of these. There’s hope! Here recording the variations:
Flower 1: 8 pairs, 30/3 cotton thread (white, “Il Giardino dei Punti” brand), 2 armspans of thread on each bobbin (way too much thread, was left with more than a span and three quarters on each bobbin).
Flower 2: 7 pairs, 40/3 cotton thread (ecru, “Il Giardino dei Punti” brand), 1 arm span of thread on each pair of bobbins (this also leaves more than half the thread on the bobbins, but at least you can move comfortably when doing the sewings at the end).
Flower 3: 7 pairs, 40/3 cotton thread (white, old, out of production Coats Filato per Tombolo, sadly no longer manufactured, an excellent thread if you can source it), 1 arm span of thread on each pair of bobbins.
My very first “fiorellini” – this is the wrong side, with the tying off well visible.
Disclaimer: I am only a beginner, and as such I have neither the ambition nor the arrogance to teach anything to anyone. I am just gathering here what I know so far and what I have found out about this beautiful type of lace. I had not the easiest of times gathering information on Cantù lace, so I am putting it here partly for my own convenience, partly to help anyone wishing to learn more about this beautiful lace find references and pointers. I will be most grateful to anyone highlighting mistakes/omissions/imprecisions and I will be more than happy to amend, correct and improve: this series of posts is very much work in progress!
Cantù Lace is one of the many styles of Italian bobbin laces (for a very informative website on Italian lace please check out Merletto Italiano – you can use google translate to read it). It has a very long tradition (plenty of bibliography here). I started learning bobbin lace while in the UK relying on all the info I could find in the very extensive literature on the techniques (and history) of bobbin lace existing in English. I have since branched out to other sources and non British authors, but what pained me is that on the one hand Cantù lace is mostly known in both the UK and continental Europe as Milanese Lace, and on the other there is really little written in Italian on this lace, and what there is is pretty hard to find.
First of all: I don’t know much, but one thing I do know, which is that Cantù lace is NOT the same Milanese lace – Milanese lace, as it is known in the anglophone world and in Europe, is called “punto Milano” (lit. “Milan stitches”), and it is just a section if you will of the techniques used in this lace. Beautiful as we know, but that is not all, and since we can all recognise beauty, there are plenty of different traditions that use these gorgeous decorative braids (“Goriziano” Lace comes to mind), but Cantù is more than that. Nor is Cantù stuck in the past, so to speak, as there are many modern interpretations that while retaining the constituent elements come up with designs fit for a more contemporary taste. Again, this is as far as I can tell at this stage, don’t forget my disclaimer at the top!
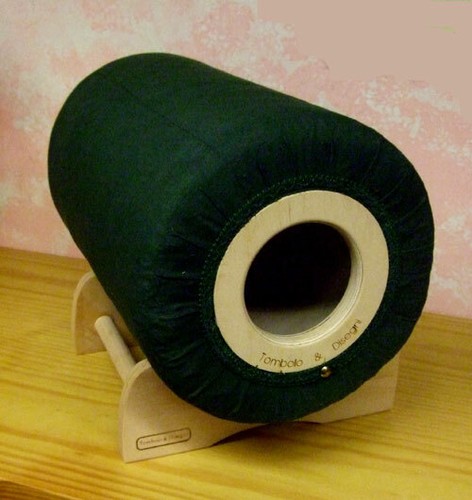
My bolster – typically you wrap it in an additional removable, washable cover.
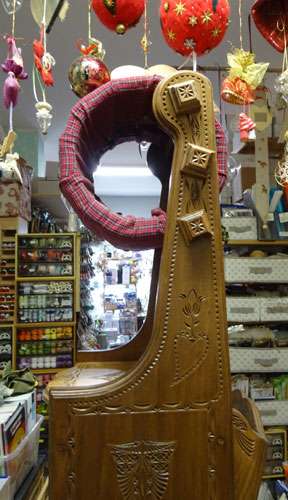
Cantù lace is typically worked on a 25cm/10″ diameter bolster pillow with an empty core (quite handy to put all the little utensils). There are all sorts of supports, but the traditional one is a trestle, and correct placement/inclination of the bolster as the work progresses is achieved via a wooden bat, called “tapparella” (or “paletta”). Of course you can use whichever size bolster you like, but this is the standard (and you can of course make your own). Pillow lengths typically go from 20cm to 60cm or more. I’ve got two 40cm and a 30cm at the moment, planning to make a small 20cm travel one.
The picture above (taken from here) shows the tapparella/tombolo/horse setup in action.
Traditional horse style floor support, with “tapparella” to keep it in place
Bobbins have a typical “elongated waterdrop” form – at the top they can be “una testa” or “testa doppia” (one or two “heads”) – I only have a single specimen for double head, which isn’t the most typical however, as the characteristic round head normally sits on top of both styles of bobbins. Boxwood (aka “martello”, or “bosso”) is considered the best wood, being dense, but olive wood is also popular (and very beautiful).
Some of my olive wood bobbins in action
What makes it Cantù? The stitches and motifs.
Cantù lace is a tape lace (aka “merletto a fili tagliati” in Italian), particularly popular in the little town of Cantù, that at least in Italy is famous for three main things: furniture making, the basketball team, and of course, bobbin lace. I won’t go into the history here (will point you to sources later), but the short of it is that there’s evidence of lacemaking in Cantù since late 1600.
There are various motives and set of stitches which are specific to Cantù, some of which are borrowed (with adaptations) from other laces, some of which have been borrowed by other lace traditions. As far as I can tell these are:
Punto Mimosa: a narrow, continuously curving braid worked with four pairs, with a footside on the outside of the curve, and half stitch on the inside. It is used to fill the space, and it looks light and airy. The winding braid filling the ground of the piece below is in Punto Mimosa (picture taken from here) To learn this stitch from a free resource you can consult the videos by Emanuele Bonaglia (e.g. here) or lace along with Raoli (and his Christmas bauble, pattern available here). The bauble is really fun, apart from learning about Punto Mimosa you will also learn how to make straight and Y shaped “barrette”. Other distinctive elements in this piece are the Fiore di Gigliola (the big flower at the bottom in which the braids end) and the fiorellini (in this interpretation the leaves have holes, but they can be filled), the little flowers in groups of three.
Punto Venezia (aka Punto Cantù Classico): this is characterised by three main elements – “uncino” (hook) or “ricciolo” (scroll); “bandierina”, banderuola or foglia (“Flag” or “Pennant” or “Leaf”); stella or three (or five) petal flower/rose. These element come off a central “branch” (ramo), the picture I annotated below comes from here. Another characterising element is the “cordetta”, or relief that goes around the various elements. While the motif I annotated is rather classic in style, as I mentioned earlier there are some versions that look more modern. For instance take a look at this piece designed by Mariangela Cappelletti and worked by Francesca Panzeri, presented in December 2022 at the Palazzo Moncenigo Museum. Punto Venezia occupies most of the centre. Note also the examples of Margherita, another distinctive type of flower in Cantù lace, and the leaves. A free resource to learn about Venezia has been made available by Il Giardino dei Punti on YouTube (in Italian – part 1 and part 2) which is a “lace along” of this free pattern. The ramo is typically worked with 8 pairs – four of these separate to work the scroll with an additional fifth pair. The bandierina is also worked typically with 5 pairs, all of which come from the main “ramo”. The three lobed flower and the ricciolo with 5 pairs, the Stella with 8 pairs.
Punti Milano (aka “Milanese Lace”): a family of decorative braid. There are tons of books on this written in English and German (think Pat Read and Lucy Kincaid, Barbara Corbett and Christine Mirecki). They are also used extensively in Goriziano lace. The Lacemaker Diary has a lace along with a sampler of various of these stitches – still this is probably the single family of stitches with plentiful information in English.
Punto Rosalin: This is a version of the original Belgian Rosaline, but it is somewhat different (simplified?), and is noted differently in the prickings. The constituent elements are a five petal rose with the centre (called “seme”) in relief; the “ramo; veined “foglia” or “pesciolino”(leaf or small fish), “ricciolo con petalo”, “ricciolo sagomato”, flower with leaves, “corolla a ponte” e “quadrifoglio”. You can catch up with this with either the Il Giardino dei Punti DVD on Rosalin or with the second of the booklets by Civiltà Canturina (see below).
Ragnetto di Cantù(i.e. spider): this is a different type of spider (classic torchon), and it is reminiscent of Tenerife lace – the principle of it is that of a web woven spiralling around that spirals around a radial frame, like a spider web. The examples below are taken from Mani di Fata and Giardino dei Punti.
spranghette/barrette: in Cantù lace the this type of lace the decorative bars are always closed, as is apparenti in all the pictures. They are worked by making a sewing from one side to another, and then constructing a false braid around the two threads going across.
Palmette/pesciolini e Punto Spagna: “palmette” or “pesciolini” stands for leaf tallies. What is less usual is “punto Spagna” which is typical of Cantù lace and is worked pretty much like a tally, but where each pair is treated as a single passive, apart for the workers. The result is a neat braided cord. Clear instructions on how to work it are here (again, in Italian, but the video is clear enough):
Rosa Canturina: flower characteristic of Cantù lace, together with the “fiore I Gigliola), which is a flower shape worked only by winding the tape. It is the shape at the centre of the picture below (pricking by Il Giardino dei Punti).
Punto Ornato: on this one actually I am not too sure, but I think it refers to the tape changing shape to create motifs, with addition and removal of passives, and with veins, holes and other decorations, with a footside and no reliefs. So the motifs in the corners of the design by Cappelletti shown further up could be ornato. I will revisit this when I know for sure!
The list above is not exhaustive, and I may keep updating this post as I learn more.
Annotated bibliography
History:
Salvatore Dell’Oca, 1988, Cantù nella storia del pizzo, Meroni. In Italian. This was published in 1,000 copies (I am the proud owner of copy n ). While there is a market for second hand copy, it is actually still possible at the time of writing to find it cheaper and new at “Civiltá Canturina”. The book contains a really large section of pictures of historic laces, that are just wonderful!
Technique:
Free resources: the excellent YouTube channels by the already mentioned Emanuele Bonaglia (aka The Lacemaker Diary) and Raffaele Oliva (aka Raoli Tombolo). They both provide technique videos and pattern “lace along”, with the difference that Bonaglia’s patterns are available for free, while Oliva’s are freely available to download from his Facebook page. Oliva in particular has several lace alongs, which really feel very much as graded tutorials, as each piece goes over particular techniques. Bonaglia’s videos instead are more in the style of bite-size clips to zoom in on a specific technique, although he does have an almost complete lace along on the “Punti Milano” (aka Milanese lace) on a pattern of his (which you have to purchase separately) . Putting the two together will already keep you busy for months. Both Bonaglia and Oliva are also lace teachers offline. The other resources below are all available for a charge: this I think is fair enough, you are paying for knowledge.
Mani di Fata “Scuole” (in Italian)- this is a series of 15 booklets accompanying the September issue of the craft Magazine “mani di Fata” from 1996 until 2011. You may still find some of them on eBay, but it is possible to buy the electronic version of them here. Rather than a structured course, these are technical drawings explaining how to execute the prickings for the lace published in the magazine. Still you can learn a lot from these, only you need to peruse them to find what you need. Each issue starts with a picture of the laces that will be explained, so on the basis of those you can check whether the particular technical passage you are interested in appears in that piece of lace. Some of the prickings are stilll available to buy separately from Mani di Fata’s website either individually or as collections (which can also be found from other retailers). The pricking in the collections are transferred to craft paper with an iron. There are several more of these collections still to be found for sale by googling “Disegni decalcabili pizzo di Cantù”, there should be six or seven of them in total.
“Passo passo verso il Pizzo di Cantù”, 2021, volume 1, edited by Civiltà Canturina (in Italian) This is an instruction booklet that packs quite a lot in its 32 pages. It covers cloth stitch, half stitch, tape with headside and footside; curves (a couple of types); pointed start and finish; the set of Venice stitches (“Punto Venezia”), including “ramo”, “ricciolo”, “stella” and “bandierina”; mimosa stitch, five petals rose. It has the same style of technical drawings as the Mani di Fata publications, has no prickings, and is very keenly priced. It can be ordered directly by emailing the shop.
“Passo passo verso il Pizzo di Cantù”, volume 2, Civiltà Canturina (in Italian) This one covers some flowers and leaves, the Rosaline stitch, some simple grounds.
The set of DVDs by “Il Giardino dei Punti” (in Italian). Each DVD comes with prickings and thread, and it is in practice a “lace along” of the prickings enclosed. They are not cheap, but very well made.
Cantù lace prickings
One typical element is that Cantù prickings are drawn for a specific thread thickness, and mark all the points where the pins go – some are sold pre-pricked. Online shops selling prickings:
Some notable designers and promoters of Cantù lace
The list below is most incomplete – I will update it as I learn more. I am haiving a hard time finding out about designers, as this seems to be mostly “insider knowledge”, with most publications produced as a collective without identifying individual authors. So there are the original designs found in magazines, books and shops, but often with no indication of who the author is. So with apologies to all those I am not crediting, below is a partial list.
Ada Arnaboldi: the teachers’ teacher, you can see her in this 2012 video
Patrizia Arditi: she does sell her designs online. These are fabulous.
Rita Bargna M.A.M. (Maestra d’Arte e Mestieri): I wish I knew enough so that I could properly acknwledge the enormous contribution of this exceptionally talented lady to Cantù lace! Apart from being a lacemaker and teacher, she is also an avid collector. More information, including an interview to the lady herself, is available at the European Heritage Awards page (she received the award in 2021), here.
Flavia Tagliabue, former president of the Accademia dei Merletti di Cantù and author of several books (see below).
Sources/more information
In addition to the bibliography above, I have drawn information from the following sources:
Comitato per la promozione del merletto di Cantù: (English and Italian) The committee for the dissemination and appreciation of Cantù lace, also organising the biannual lace exhibition. Also linked to it is the Merletti e Design project (in Italian only), with some pretty amazing lace artwork.
Fioretombolo: (in Italian) Exhaustive website on Italian lace – Cantù lace is considered here.
Intangible Search: (English, French, German, Italian) collects multilingual information on, among others, Cantù Lace.
Merletto Italiano: (in Italian) another treasure trove of ananything to do with lace in Italy, considering other techniques in addition to bobbin lace, such as Filet, Macrame’ and so on. It is the brainchild of Alessandra Caputo, a connoisseur of anything lace related, author of various books on lace. Cantù lace information can be found by going the the “Protagonisti/Lombardia” menu.
Pizzo di Novedrate website: (in Italian) includes a virtual museum – site well worth a visit, even if you do not understand the language. Here you can find pictures of some of the stitches.
(Check here for how to make a flat, block lace pillow).
I am Italian, and while the first type of bobbin lace I started studying is in the British tradition (Bucks, Beds, torchon), which is typically the “palms down” type, worked on a cookie (or flat) pillow (of course there are exceptions – Honiton pillows are not cookies but look more like a drum, and bolster pillows are used in the UK too, but not as frequently as far as I can tell), I always wanted to get back to my own traditions – Italian laces are typically of the brade lace type (Cantù, Goriziano, and Ligure to name just a few) but not only (Aquilano). The overwhelming majority of Italian laces are however done on a bolster apart from some notable exceptions (e.g. the tradition in at least some areas in Tuscany seems to be cookie pillows, I’ve seen some really huge ones!).
The diameter of these changes too – Gorizian lace (which is related to Idrija – geographically they are not too far from one another) is done on smaller diameter pillows, about 18-20cm, while Cantù lace is done on 25cm diameter pillows.
Fillings and shapes are different too – Cantù pillows have a hollow centre:
and are typically filled with straw like materials or linen flax, while Gorizian lace bolsters are full and filled with sawdust. Boltsers from Cogne are filled with felt and woollens, and are even “hollower” than Cantù ones:
and I am sure there are many other types (the ones in these pictures are nicked by the Tombolo e disegni website – an amazing store where you can find anything lace related that you can think of: if it exists, they stock it – and deliver worldwide!).
Some bolsters are gorgeous displays of beautiful wood craftmanship, like the ones from the Piedmont region of Val Varaita (just have a look at these, to die for!), not to mention the bobbins themselves, which can also be very intricately decorated – the weight on the bottom of the bobbins gives you an idea of the thickness of the thread to be used. These are different from bolsters for needle lace, which have to be softer as the actual pattern is kept above the bolster from a roller pin like implement that keeps the right tension – but to regulate tension the bolster is softer. A lacemaker from the Museo del Pizzo di Burano told me her bolster was filled with tastowels and suchlike.
Bolsters and bobbins can be a thing of beauty – what about this one?
(picture from here) and frankly I could quite easily fill my house with all sorts of bolsters and supports, and spend my days looking at them…. but I digress
So, what did I do? I wanted a 25cm diameter bolster, packed hard with straw. This is because I find the crunch of straw under the pressure of the pins enormously satisfying, and since you’ll be spending hours at your bolster, why not enjoy every single second?
If you do go the straw route, be aware of the following:
whatever you think, the pillow will take much more straw than you think. Think of the dimensions you like, calculate the corresponding volume, then check the weight of the chopped, compressed, dust extracted straw you buy. You want to keep the same proportions with your bolster – indeed such a pity they don’t sell straw in cylinders, as covering that would give you your pillow! This is really important, as to make sure your pillow is
even if you get dust extracted straw, there will be dust generated in the process, so make sure you cover your mouth and eyes – in these post covid times I found FFP2 masks to do the job remarkably well!
even if you are careful, there will be stray straw going around – so:
be patient and be strong: allow quite a bit of time for the filling (two hours isn’t unreasonable), and be prepared for a full body workout and a lot of sweat. Buy a ready made pillow otherwise, as the risk is to end up with a substandard product after a lot of effort, which would be a pity. The good thing is that you can always reopen the pillow and get some more straw in.
So, here are my supplies:
2 x 25cm/10″ diameter strong round disks (some sources suggest using cardboard) that will form the ends of your bolster – I wanted wood ones, but in the end it was too easy to get a pair of extra strong MDF cake bases from Lakeland, thin but really sturdy, you will need something to withstand pressure. NOTE: THERE IS A LOT OF MERIT IN USING CARDBOARD, more on this below
straw – I went for barley straw, which is the tradition in the UK, and got some chopped, dust extracted, compressed one (3kg), to avoid having to chop it myself (smaller bits pack more tightly).
fabric: some heavy calico or heavy (say curtain weight) cotton for the actual pillow, and some lighter fabric for the removable cover.
6mm or 8mm cotton drawstring cord
a mallet, or a heavy rolling pin, or a cricket bat, or whatever will allow you to bash the straw.
To begin with, I found it rather useful to have a look at this video, just to see from beginning to end how it would have to be:
How to make a straw filled bolster – he uses cardboard as ends
Then it was time to get started – but how much straw did I need? The guy in the video mentions “a third of a bale of straw” but surely it depends on how big your bolster, and I wanted to be sure I ended up with the right density. I needed to do some homework…
Some pillow math – how much straw?
The pillow must be dense – since the barley straw I bought felt quite right, I calculated its density, so as to replicate the same for my pillow.
The 3kg package measured 18 x 28 x 45cm=22,680 cubic cm. This means that each cubic cm weighed 3,000g/22,680=0.132g.
I wanted my pillow to be 30cm wide – with 25cm diameter, its finished volume would be 12.5 x 12.5 x 3.14 x 30cm=14,718.75 cubic cm. Hence to obtain the same density as the bale I bought, I needed 0.132 x 14,718.75=1.943kg of straw.
I cut two 60cm x 90cm (i.e. 24″ x 36″) rectangles out of each of the two fabrics, and sew two cylinders out of each, allowing for a doubled up hem as casing for the drawstring. I sewed the seam along the length of the casing three times with silk thread, the strongest natural thread (I think) as I did not want to go down the polyester route. That seam has to take a lot of pressure, not just while stuffing, but also for the lifetime of the pillow. I also made sure that the diameter of the casing was snug around the end disks.
I pulled the drawstring so as to leave about 5cm opening (I allowed 10cm overall with the base) put one disk in, put everything into a large moving cardboard box to contain the mess, and got into stuffing the pillowcase.
Stuffing the pillow – note how the seam is pulling out at the base, where I have compressed more.
I had to stab the straw with a carving knife every so often to ensure I packed it tightly. The hardest part was towards the end, as I had to put in the other end, draw in as much as possible, and check the length of the pillow to be just 30cm, to make sure I had packed it right.
Once the pillow was done (which is quite a workout), I had to get rid of the bumps, so as to have as much of a smooth surface as it is possible with straw. So I took the thick rolling pin you can see in the picture above, and went to work on it. I literally rolled the side (with considerable force) until it looked reasonably smooth. That takes a while, too.
In the end the total weight of this pillow, including fabric and ends (roughly 400g), is 2,114 grams so about 150g more than the straw I wanted to put in, which makes me think that I got the density about right, though possibly there is a bit less straw than I wanted. But I am pretty happy with the results, and working on it is quite a joy!
This was in fact my second pillow, the first one I think needs a bit more straw and a bit more bashing, so perfect activity when you have some steam to let off, perhaps on a rainy day…
UPDATE following the making of pillow n. 3: I had about a third of the pack of straw left, and I was really desperate for a small enough pillow of the traditional diameter that I could take in my hand luggage. So, I made my third one (which is my best one yet!). While bashing the straw in (aided by a kettlebell), I cracked one of the MDF disks. As I had no replacements handy, I use the undamaged one as template to cut out two cardboard disks from a box. This turned out to be a blessing in disguise, since the cardboard is flexible, unlike wood or MDF, and allows much more compression of the straw filling. And so, with a lot of physical and rather strenuous effort and lot of patience, I have managed to stuff enough straw to have a density pretty close to the original bale (about 1.4kg as required by my 25 diameter, 22cm wide travel bolster, total weight is 330g more, the weight of the fabric and cardboard ends). I had cut through the cover while stabbing at the straw, so I made a second cover in case the internal one eventually give in, adding MDF toppers on both sides in case the cardboard eventually deteriorates. My best pillow yet, useful for samples, little pieces, or also something more substantial like scarves. Very happy, and above all, it can travel with me!
(Check here for how to make a bolster pillow for bobbin lace)
Block pillows are very useful for bobbin lace done on a flat (i.e. non bolster) pillow, as it allows the lacemaker to progress the lace without having to “move up”: once your lace occupies most of the pillow, you have to unpin and move the whole thing up/sideways to continue, say you are working on a tablecloth or anything larger than a motif.
For me the drawback is that blocks are typically made of foam, and after a while all the pinning makes them go soft, not to mention that I’d like as much as possible to stick to natural materials.
I had come across a German lace supplier selling felt block pillows: beautiful, but very expensive, and on top of that the covering seemed to be held by glue, so I wasn’t too convinced I’d be happy afterwards. And so it was that I set out to make my own, and here is how I did.
First of all I ordered 50cm of this 100% wool industrial felt: it is denoted as “soft” for industrial purposes, but it is in fact pretty stiff, and I do mean stiff! But my expert lacemaking friends tells me that pillows must be stiff to hold the pins well, so why not?!
Before ordering I had tested on a sample that it would be stiff enough to hold the pins, but also soft enough not to be impenetrable (they kindly sent me a small sample, which was enough for testing). The “0.18 density” denomination means that it weighs 0.18g/cm³. So the whole 180cm wide piece I ordered (which came rolled up) weighs 180×1.2x50x0.18/1000=1.944kg. I should add that this was by far the cheapest 100% wool felt I could find, and in the right density (most others were denser, and I was afraid pins just won’t go in), and the people there couldn’t have been more helpful (and my guess is that mine was a tiny purchase from their point of view).
I made the blocks by dividing the 180cm wide strip into four pieces. I then put three of them one atop the other and cut through. To cut through this dense felt you will need a cutter – this video was very useful for me to figure out how to cut the felt:
It is worth investing in a good cutter with a suitably long blade (as in the video) – mine has a short blade, so it did take a bit of extra work.
The blocks over the felt base1 block= 3 12mm layers
The felt blocks are cut!
The blocks aren’t exactly identical (thanks to the cutter and my “skills”): I thought the covering would take care of that, but I kept track of the original position when I cut just in case. The blocks are laid on the uncut fourth piece.
To cover the blocks I used strips of calico and of close weave quilting cotton. I washed them first, just to be sure that especially the cotton would not run off any dye. Before cutting any pieces I “starched the hell out of them”, following the expert advice of a very accomplished quilter friend of mine. Just a couple of points to note with starching:
1. I put the piece of fabric to be ironed flat on a tiled floor and sprayed it with starch to make sure it was evenly covered in starch. Any starch ending up on the floor will make it very slippery, so make sure to clean it up very carefully;
2. if you starch while ironing, be aware that any starch ending up on your ironing board may be burnt by the iron if it comes in direct contact, so again do wipe it out
3. iron without steam.
The starching makes the fabric very crisp and stiff, making it really easy to cut. It also removes the need to zigzag at the cut.
I first cut a template in tracing paper, checking that it would accommodate each block, then cut the fabric.
The template should of course include a a seam allowance. I cut both calico and cover cotton of the same side, of course bear in mind that the covering cotton will have to also accommodate the thickness of the calico.
Fabric ready for stitching
Again following the advice of my seamstress friend, I stitched the strips of fabric around the blocks using slip stitch. I found this video really useful to figure out the slip stitch, though unlike the video I had a seam allowance on both ends being stitched together:
My stitches were of course also much closer, I’d say about 3-4mm. I took an amount of thread equal to three times the length to stitch. Not sure what the size of my needle was though.
Stitching the cover so that it fits snugly means you have to pull the thread a lot, so I used silk sewing thread (Gütermann S303), which comes in many shades. I happened to have already the exact shades I needed, though with slip stitch the stitching should be invisible, so it should not really matter.
For each block, I started by stitching a tube (along the long side – my blocks are not square) with the calico: I made the the seam allowance so that it would fit the block snugly, but I stitched the fabric without the block inside, so that I could press the inside seams flat. I then slipped the block inside, so that the seam would be in the middle of a side. I pressed a seam allowance of about 5mm to cover the other two short sides, stitching it all along, then tucking the two corners inside. I pressed with the hot iron all around the block.
One block done, on to the nextThe long side is stitchedseam allowance on the short sidesPinning the short side for stitchingBlock cover stitched, and c orners tucked in
I repeated the same process with the cover fabric, wrapping it over the calico.
Of course there is nothing preventing using the sewing machine for two out of the three seams required for each cover, which is what I ended up doing after sewing both covers for the first two blocks.
And then it is done!
All is left for me to do is to add a strap all around to tighten up and minimise the (unavoidable) gaps.
Still to come, how I made a bolster bobbin lace pillow!
My slide into galleries deep down the thread and yarn crafts rabbit hole continues inexorably and is gathering pace… and so it was that in the middle of June I became the proud owner of the necessary supplies to get started on bobbin lace. It shares aspects with weaving, but with the roles of warp and weft threads constantly changing.
There are two broad classes of bobbin lace: continuous lace and part lace. The names tell it all, in that continuous lace consists in working the final piece as a single item, while in part lace various motifs are stitched independently then joined together.
Bobbin lace uses, of course, bobbins, and on these alone the selection is pretty much infinite – they go from machine made to hand turned, out of wood, bone or metal, resin and even glass (in addition to plastic – though these are pretty rare). They can easily turn into works of art, and master craftsmen and artist embellish them in all sorts of ways, from inlays of brass wire, silver, gold and other materials, to intricate carving, to beautiful painted decorations. A list of lace bobbin makers and decorators is here – so they are mostly UK based, with the exception of one maker based in Belgium. In addition to these here is a link to Jean Roux, in France, who delivers to the UK and has some exquisite work (continental lace bobbins only).
Bobbins hold thread (cotton, linen, silk) that is pinned (yes, you need a ton of pins) on a pillow – and here too, the variations are very many. Again, there are two main families: the bolster pillow, around a roller, which usually is worked “palms up”, that is the bobbins hang freely down the pillow (from the pins), and the lace maker manipulates . Mostly a tradition of continental Europe, this uses so called continental bobbins, which have a bulbous end to tension the thread. The second category is mostly flat, or domed shaped (cookie pillow, flat pillow). The lacemaker in this case works typically “palms down”, as the bobbins lay on the pillow and are shifted around. For these pillows typically you’d use Midland bobbins, which are uniformly thing. To avoid them rolling around the pillow they are spangled with beads (can you see another sliding gallery opening here?!), adding a further array of possibilities for personalisation and decoration of your tools. Why not use precious stones for spangles?
Chris Parsons‘ beautifully hand turned bobbins – these are among the simplest in his range
How beautiful bobbins can be is really hard to describe – the bone ones decorated with flowers and butterflies pictured at the top are my first crafted bobbins, beautifully painted by Dee Carver. The pins in the picture above are “divider pins”, which are used to separate various groups of bobbins – obviously the lace maker needs these to be very pretty too!
The beads attached are the top are typical of the “Midland” style of bobbins which are prevalent in the UK bobbin lace tradition, and are needed to both weigh the bobbins to improve tension, as well as to avoid the bobbins rolling around. Those beads are called “spangles”, and spangling (i.e. adding beads to bobbins) of course opens up all sorts of possibilities.
Semi precious stone spanglesPairing bobbins to spangles
Talented, award winning designer Louise West has an instructional YouTube channel – among other things, she also expansion how to spangle bobbins:
Louise West on bobbin spangling
Bobbins work in pairs, each pair holding a different end of the same thread, and the whole process is based on two basic movements involving two pairs: Crossing and twisting. A cross is when the bobbin from one pair moves from the left to the right and over the adjacent bobbin from the other pair. A twist is when one bobbin moves from right to left and over the adjacent bobbin in the same pair. And that’s pretty much the basis of bobbin lace making, the same as “over, under; under, over” is on the basis of weaving. And yet endless sequences of combinations of these movements produce some amazing cloth – this fascinates me no end!
The pinning, crossing and twisting takes place following a pattern, which is prepared, or “pricked”, on sturdy card that is pinned to the lace pillow: pricking consists in making holes in the cards where the pins to make the pattern will go. The pricking of the pattern can take even hours for a complex/large pattern, and lace makers do embrace technology. The amazing Louise West has developed. And of course there is software to make patterns, too.
As in weaving, the connection with maths is inevitable – so enter Veronika Irvine, an amazing artist who also happens to be an academic mathematician and computer scientist. Tech and lace are an obvious match for modern times, and I will blog on this separately – for the moment I invite you to lose yourself in Veronica’s site.
So, if you catch the bug, where to start? Torchon seems a favourite to introduce the absolute beginner to the magic of lace, so that is where I am starting from – here are my very first and very bumpy practice pieces (first to the left, last to the right), there is at least one mistake in most of them.
My first lace samplers – first two from the left are from Doris Southard’s book, the other four correspond to the first four exercise in Bridget Cook’s “Torchon Lace Workbook” – with warts and all!
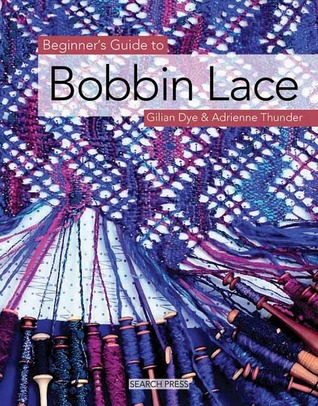
Below the books I am using (there are a couple more that I could not source, but are usually highly recommended: Pamela Nottingham’s “The Technique of Bobbin Lace”, 2001 edition; Betty Alderson’s “Bobbin Lace Without a Teacher”; and Christine Stringett’s “The Torchon Lace Book”). Of those I have, the three I would consider essential are both of Bridget Cook’s and Jan Tregidgo’s book, however I am happy that I have all five:
“The Torchon Lace workbook”, by Bridget M. Cook An excellent book for beginners, strikes a great balance between thorough instructions and getting you going. Ten increasingly involved exercises covering the all the basic elements, and 27 patterns.
Wonderful diagrams show clearly the interlacing between the treads. Definitely one to have.
Rather than diagrams, there are a zillion photographs, and each sampler is presented both in white only and in a version with bobbin pairs in many different colours to show the paths clearly.
Another must have.
“Lessons in Bobbin Lacemaking”, by Doris Southard Probably the most old fashioned in terms of teaching style, in that it lacks the detailed photos and diagrams of the previous two books, but it is the only one that ventures into other types of lace. Another one for the bookshelf!
The less comprehensive of the four introductory texts listed here. On the plus side, plenty of clear photographs, and several simple patterns for “useful” lace, e.g. scarves.
Only available as paper book.
“Practical Skills in Bobbin Lace”, by Bridget M. Cook This is most definitely not a beginners book – however this very comprehensive reference book for anything you might need to know, supported by Bridget Cooks crystal clear diagrams, is very useful to have handy even for the beginner, so it is an essential reference also for the beginner.
This must be the most comprehensive reference to lace making – or maybe not, but it is for sure very comprehensive. For each issue there are several alternative solutions, and as other of Ms Cook’s books, the diagrams are excellent and very, very clear.
The ten sections cover: 1. Starts and edges 2. Knots, replacing threads and adding pairs 3. Joining and sewings 4. Connections and crossings 5. Picots, tallies, Venetian cords, plaits and braids 6. Carrying pairs, raised work, fillings 7. Intendation, corners, curves and holes 8. Cordonnet, gimps and beads 9. Completions, endings and finishings 10. Moving up and mounting
An invaluable tool for the self learner, I think this is an essential reference for bobbin lace makers.
This is a short-but-not-too-short introduction to Torchon lace.
It does not set out to be comprehensive, but to get going as quickly as possible. It covers the core techniques, and does so by means of projects, rather than samplers, illustrated step by step by very clear photographs. Tips and additional information are in the text boxes that pepper the book.
Another plus is that there are several patterns for “useful” laces, including purses and scarves – this alone may make it worth the purchase, though obviously the patterns are not too intricate, in line with the technical content of the book, while still looking good.
It may be most useful for those wishing to try out bobbin lace and figure out quickly whether they like it or not – however delving deeper into the art will require another book.
This beginners book is packed with pictures, with literally are step by step, and uses colour very smartly, in that each bobbin pair uses a different colour, making the path of each super clear. Samples are presented both in “full colour” and in white only version, and this in itself is incredibly useful for the beginner.
This book is the most thorough of the beginner books I have seen (Lessons in Bobbin Lacemaking, The Torchon Lace Workbook and Beginner’s Guide to Bobbin Lace): it includes 25 samplers that cover all sorts of combinations of techniques, and then branches out to more advanced techniques, such as adding beads to pieces (and yes, there are samplers for this too), designing and modifying patterns, joining and mounting pieces, and finally a “troubleshooting” section. However do note that this book does not include tallies and leaves.
Each sampler lists at the beginning the techniques that are explored in the chapter.
While only few of the patterns in the samplers can stand on their own as projects (unless you are really keen on bookmarks), the great variety of combinations provided, plus the chapter on designing your own patterns, mean that imagination is the only limitation once you get a bit of practice under your bobbins. And there are some patterns, like the very pretty coasters of sampler 10, and the mats from the last few samplers.
It may feel like slow going, but in fact as you work your way through the samplers you are shown how to combine various elements, so I expect the move into adapting and designing own patterns will be a natural one (but I haven’t worked my way through this yet).
After working through this book I think I’ll be ready to work any Torchon lace pattern. Definitely one to have.
An excellent book, in addition to ten lessons on the various Torchon techniques, it also has a lesson on working on a flat pillow and a lesson on other types of laces than Torchon.
Important note: One peculiarity of this book is that the stitches are different than in other texts – so the half stitch here is TC (twist, cross), and then she uses cloth or linen stitch for the whole stitch (CTC), and calls “whole stitch” the sequence TCTC. Other texts have the half stitch as CT, and call refer to the sequence CTCT as “whole stitch and twist”. So this different terminology is to bear in mind when jumping between books. One peculiarity of this book is that the stitches are different than in other texts – so the half stitch here is TC (twist, cross), and then she uses cloth or linen stitch for the whole stitch (CTC), and calls “whole stitch” the sequence TCTC. Other texts have the half stitch as CT, and call refer to the sequence CTCT as “whole stitch and twist”. So this different terminology is to bear in mind when jumping between books. It is also unusual in other respects, as for instance tallies are worked using bobbin n4 as weaver, rather than the more usual bobbin 2 or bobbin 3, , though it is not incorrect (at least Cook’s “Practical Skills in Bobbin Lace” states that any bobbin would do).
Each lesson includes multiple samplers, with full instructions. The very many samples mean that progress to the next technique is slow, but nothing prevents jumping ahead!


 To learn this stitch from a free resource you can consult the videos by Emanuele Bonaglia (e.g.
  Another characterising element is the “cordetta”, or relief that goes around the various elements. While the motif I annotated is rather classic in style, as I mentioned earlier there are some versions that look more modern. For instance take a look at this piece designed by Mariangela Cappelletti and worked by Francesca Panzeri, presented in December 2022 at the Palazzo Moncenigo Museum. Punto Venezia occupies most of the centre. Note also the examples of Margherita, another distinctive type of flower in Cantù lace, and the leaves.
 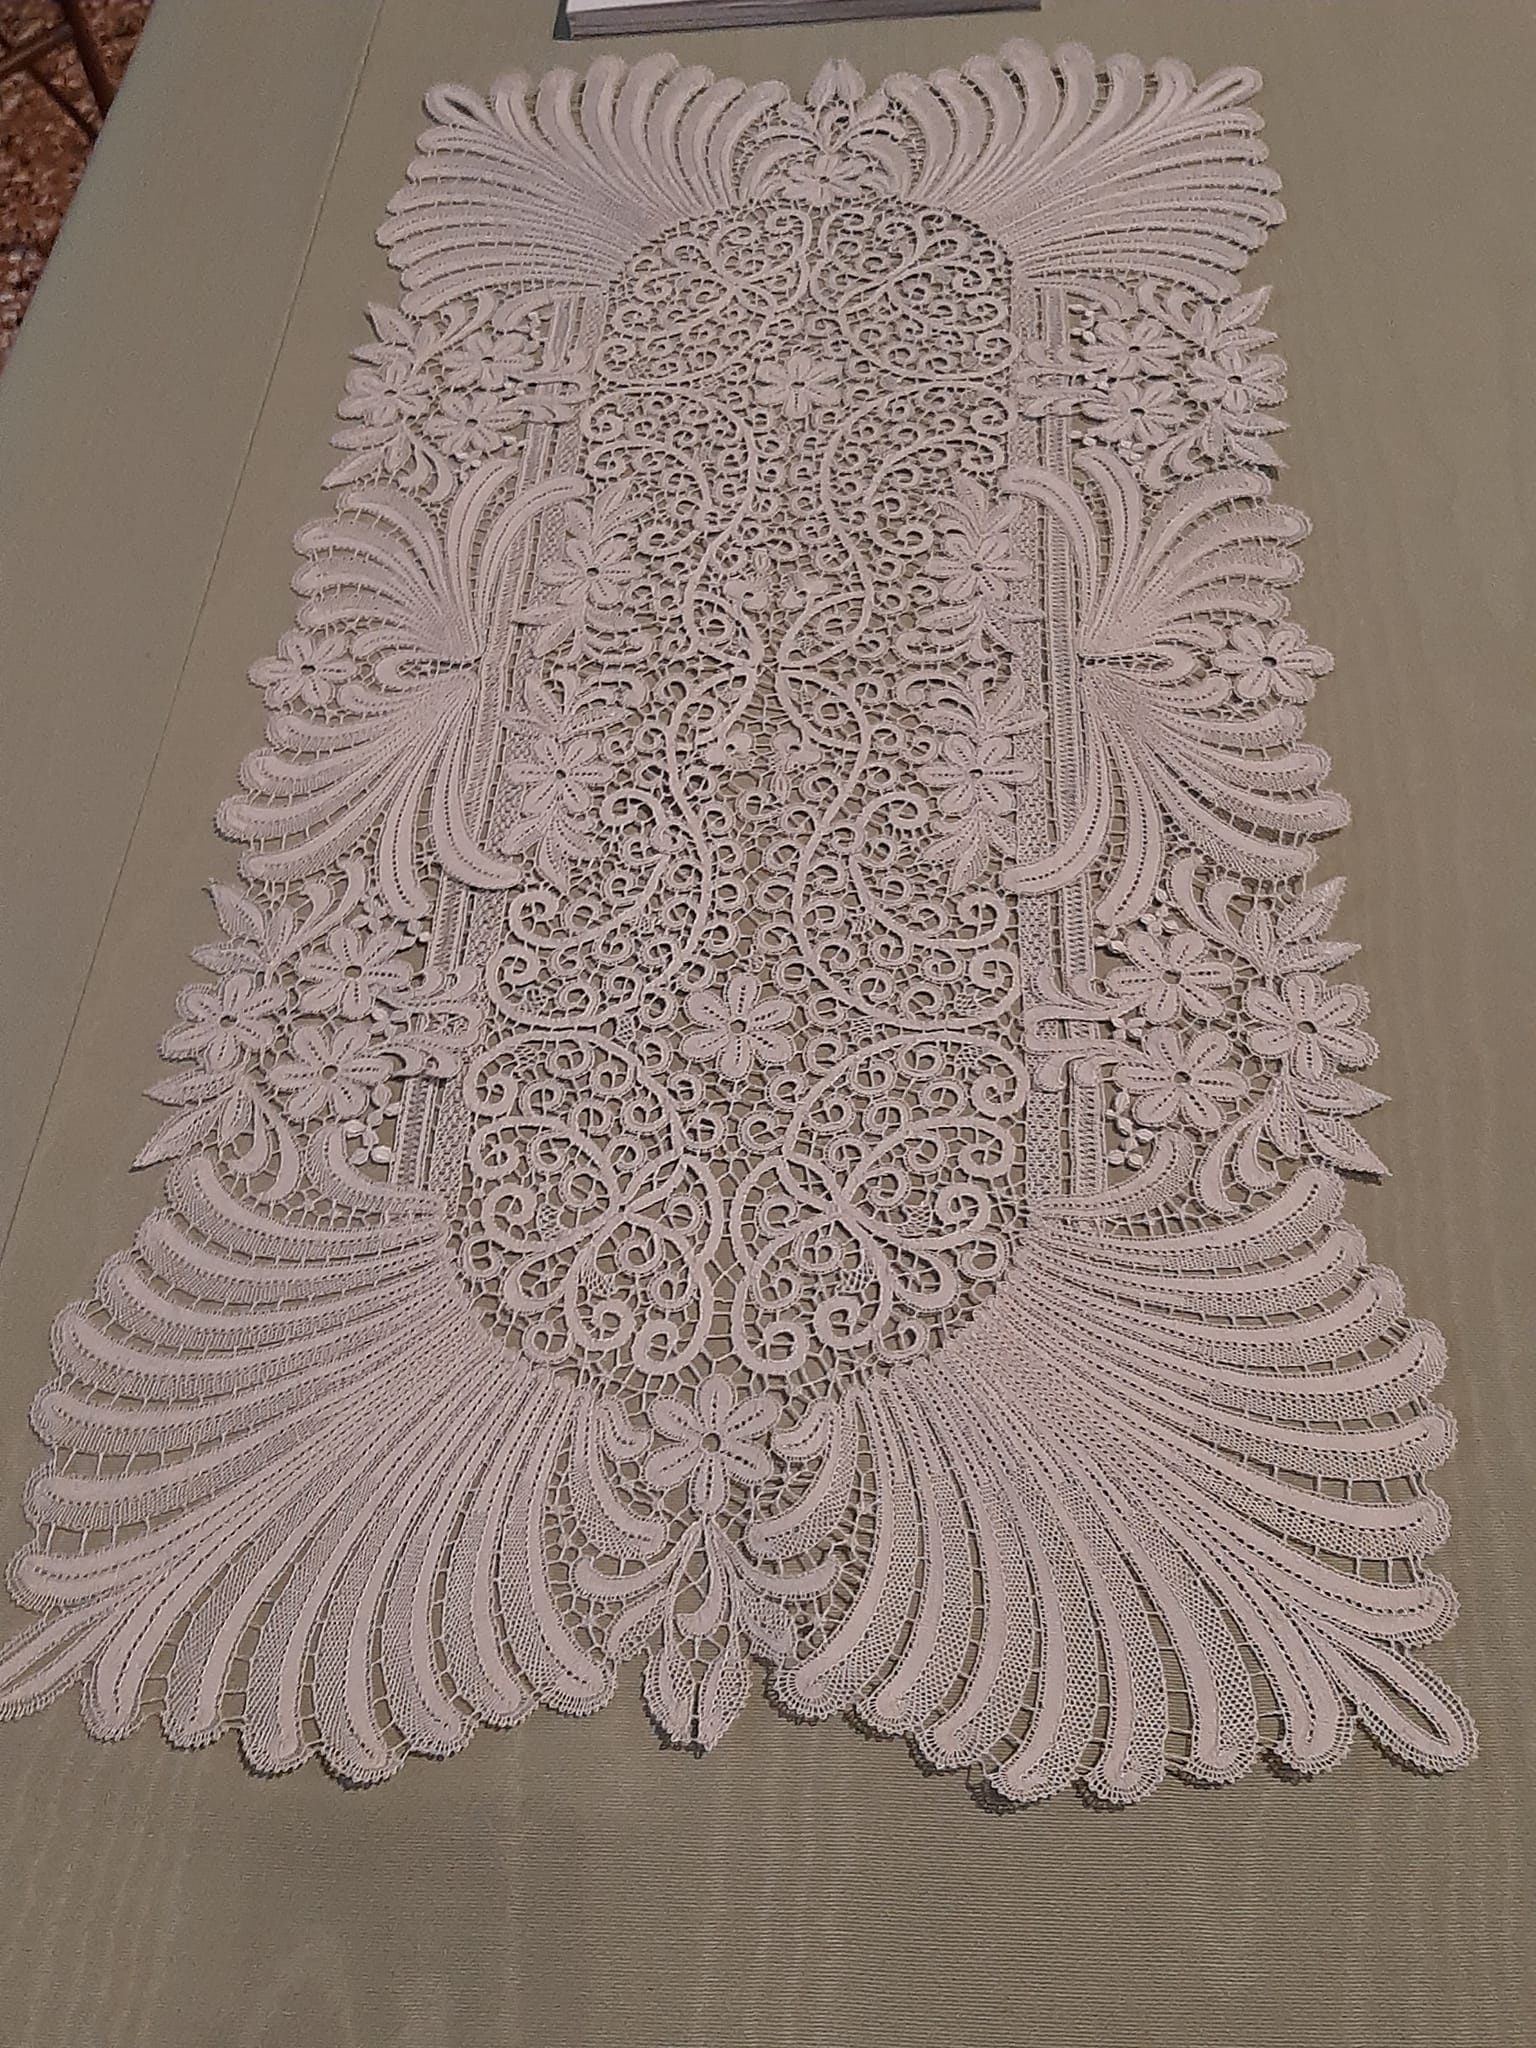 A free resource to learn about Venezia has been made available by Il Giardino dei Punti on YouTube (in Italian –